As promised (okay, 4 months later - sorry!), I am here to report that finding lamps to fit those darned bulbs, which wouldn't cost the earth, was a painful process!
In the end, I settled on 3 of these beauties!


Ordered from The Lightworks (from one of the only suppliers I could find that confirmed the lamps were suitable for ES bulbs)at the lowest price I could find for £10.97each for the black and £19.97 for the white.
Note: The taller white lamp was ordered for behind the photobox to hover over the top for downlighting.
I gave up on finding the clip-on desk lamps because none seemed to have a big enough shade diameter or none would/could confirm.
Got 3 in total and ended up with this setup (insert picture here).
As for the pictures that resulted from the light box, they left much to be desired!!! No amount of hue/saturation editing in photoshop could get these babies light enough.
As for the pictures that resulted from the light box, they left much to be desired!!! No amount of hue/saturation editing in photoshop could get these babies light enough.


So, back to the drawing board. I figured there wasn't enough light. So, I ended up ordering two more lamps to increase the brightness. Results as follows:


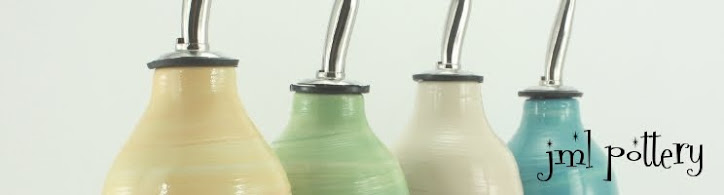
As you can see, they are an improvement, but when I photograph lighter coloured and white objects I still have some serious issues. You can see that the white and light pink suffer the most.
I'm not sure if I am drowning too much light now?
Would a coloured background paper be better to bring out the object more?
Where else can I put lamps to backlight the object? I have such a small photobox, I fear needing to make a larger one!
All the blue, green and yellow items look pretty good for beginner's standards. I am just not happy with the pink and white. Looks like I'll be posting updates on this matter in the future!
For the time being, they will suffice.


No comments:
Post a Comment